1.Introduction
1.1.General information on the operating instructions / product support
The information, data, values, etc. contained in these documents may be changed without notice. The illustrations are likewise subject to change. Subject to technical modifications!
Note
Up-to-date information is available on the Gira website.
As the software for the device you purchased is being continuously further developed and updated, information in this manual may no longer be up-to-date.
The latest product information is always available on the Gira website:
http://www.gira.de
As the software for the device you purchased is being continuously further developed and updated, information in this manual may no longer be up-to-date.
The latest product information is always available on the Gira website:
http://www.gira.de
Current software updates and documentation for your product are available at
http://www.download.gira.de
.
http://www.download.gira.de
.
1.2.Program description
During operation the user can access the HS/FS in different ways.
A conventional Internet browser usually found on every PC can be used for access. In the browser, the user interface of the HS/FS is presented in such a way that parameters can be checked and modified.
The client program included in delivery can also be used for access. It has a range of functions which is specifically tailored to the requirements of the HomeServer and FacilityServer.
The program can save all the graphics files locally when the HomeServer or FacilityServer is accessed for the first time. It uses the locally saved graphics for future access. The bandwidth required for access in the network or via the Internet is very low. Only the states or changes of state are transferred.
Communication with the client program via a secure connection (HTTPS) is supported. Password authentication is carried out. The program allows access via the Internet. The HomeServer or FacilityServer can then be permanently connected to the Internet. A PIN query can be omitted. The client program saves the settings (access profiles) of up to 200 HomeServers or FacilityServers. For access, the desired HomeServer or FacilityServer must then be selected from a list.
To use the client program, it must be installed locally on the PC from which the HomeServer or FacilityServer is to be accessed. You can also install the client program on your start-up PC in order to carry out function tests as part of programming.
1.3.System requirements
The client program can be run on a standard PC (or laptop) with an operating system from Windows® 7.
1.4.Area of application
The client program is a software interface developed especially for operating the HomeServer or FacilityServer. Any other use of the program, e.g. as an Internet browser, is neither possible nor permitted.
Gira assumes neither legal responsibility nor provides a guarantee of any kind for problems resulting from the improper use of the client program.
Gira assumes neither legal responsibility nor provides a guarantee of any kind for problems resulting from the improper use of the client program.
2.Client program
2.1.Installing the client program
The client program is available online at www.download.gira.de. You download it with the complete software package for the HomeServer or FacilityServer.
The software package is a zip file which you have to unpack (extract) on your computer after the download. The HS/FS client program is also installed as part of the installation of the HomeServer Expert software.
How to install the client program:
The software package is a zip file which you have to unpack (extract) on your computer after the download. The HS/FS client program is also installed as part of the installation of the HomeServer Expert software.
How to install the client program:
- Download the software package for the HomeServer or FacilityServer from the download area of the Gira web site.
- Unpack (extract) the downloaded zip file.
- Start the setup program and follow the instructions. The client program will be installed on your computer together with the Expert software.
- You can call up the client program via Start/All programs/GIRA-SOFTWARE/HS+FS/HS+FS Expert [Version No.]/HS Client.
2.2.Accessing the sample project with the client program
To check the functionality of the client program, you can access the user interface of the sample project which is pre-set in the HomeServer/FacilityServer without major preparation.
However, you must have connected the HomeServer/FacilityServer in accordance with the information in the brochure Information on start-up and have installed the client program on your computer.
However, you must have connected the HomeServer/FacilityServer in accordance with the information in the brochure Information on start-up and have installed the client program on your computer.
How to access the user interface of the sample project (applies equally to the HomeServer and FacilityServer) with the client program:
- Start the file hsclient.exe on your computer (e.g. start-up PC). A login mask appears.
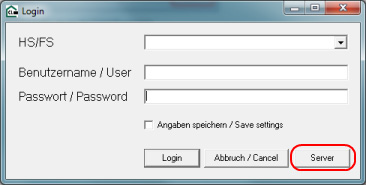
Fig. 2.1: Login mask of the client program
- Select Server. The window HS/FS list is opened.
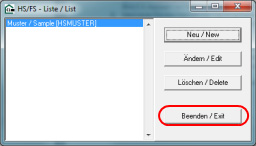
Fig. 2.2: Selection in the HS/FS list window
- Select the line Muster/Sample [HSSAMPLE] and click on the Neu/New button.
- The mask HS/FS is displayed. Here you can make various settings so that the client program can access your HS/FS.
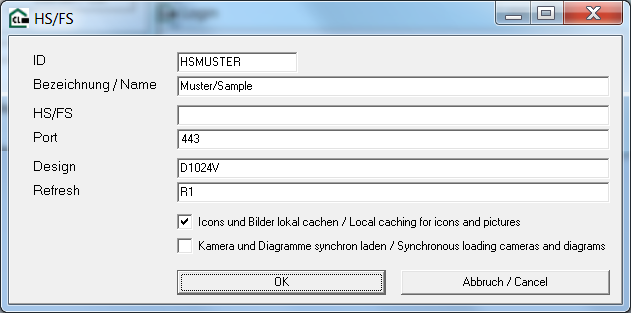
Fig. 2.3: Settings in the HS/FS window
- Make all the settings in accordance with Fig. 2.3. Please note that the IP address of the HomeServer must be specified in the HS/FS line.
If you have changed the IP address in the sample project, you have to enter the modified address here. - Confirm your entries with OK. The data is saved and the window HS/FS list (fig. 2.2) opens again.
- Click on Exit. You will return to the login mask.
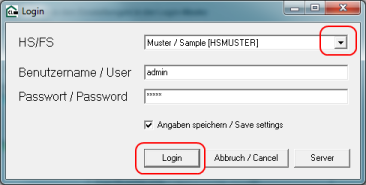
Fig. 2.4: Information in the login mask
- Make the settings in accordance with Fig. 2.4. The standard user in the sample project is called admin. You can, however, also use self-defined users which you created before the sample project was transferred to the HS/FS.
- Click on Login. The client program is started and the user interface of the HomeServer is displayed.
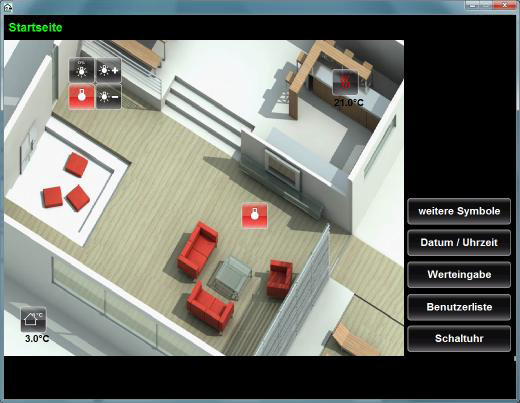
Fig. 2.5: Visualisation of the sample project in the client program
2.3.Information on the settings in the login mask
A login mask appears when the client program is started.
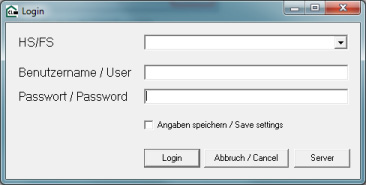
Fig. 2.6: Login mask of the client program
Fig. 2.6: Login mask of the client program
Meaning of the fields and operating elements in the login mask:
| Field / operating element | Meaning |
|---|---|
| HS/FS | List of all created HomeServers and FacilityServers. Here, select the HomeServer/FacilityServer which you want to access. All the HomeServers/FacilityServers which were created via Server are displayed in the list. |
| User name / User | User name with which you log into the HomeServer/FacilityServer. Please note that you have to set up access rights under Client for every user in the Expert software. |
| Passwort / Password | Password which was stored in the Expert software for the user in question. |
| Angaben speichern / Save settings | Saves the settings which were made in the login mask. The saved settings will be suggested the next time the client program is started. |
| Login | Starts the login process. The user name and the password are saved for the selected profile. |
| Abbruch / Cancel | Cancel or exit the client program. |
| Server | Opens a window in which you can make the settings for all HomeServers/ FacilityServers that you wish to access. |
2.4.Information on the settings in the HS/FS list
In the login mask of the client program, you open the window HS/FS list by clicking on Server (applies equally to HomeServer and FacilityServer).
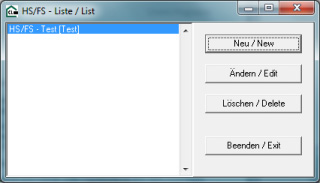
Fig. 2.7: HS/FS list window
Fig. 2.7: HS/FS list window
Meaning of the fields and operating elements in the HS/FS list window:
| Field / operating element | Meaning |
|---|---|
| Neu / New | Opens the window HS/FS to create a new HomeServer profile (see Fig. 2.8). In the window HS/FS you assign a new HomeServer which you wish to access to the client program. All the HomeServers created for the client program will then be displayed in the list. |
| Ändern / Edit | Opens the window HS/FS (see Fig. 2.8) after you have selected a HomeServer name in the adjacent list view. The data for the selected HomeServer will then be displayed in the HS/FS window. You can change the data there. |
| Löschen / Delete | Deletes the data for the HomeServer selected in the list. |
| Beenden / Exit | Saves the settings and closes the window HS/FS list. Return to the login mask. |
2.5.Information on the settings for a HS/FS
Figure 2.8: HS/FS window
Meaning of the fields and operating elements in the HS/FS window:
| Field / operating element | Meaning |
|---|---|
| ID | Key for the current HomeServer profile. Serves as a parameter for starting the program via transfer of parameters. |
| Bezeichnung / Name | Name of the HomeServer. The HomeServer is available under this name in the selection list of the login mask. |
| HS/FS | The following entries are possible here:
|
| Design | Key of the design to be used. Here you enter the key which was assigned in the start-up software HomeServer Expert under Project/Design for the design of the HomeServer (e.g. D1024V). Observe the use of upper case and lower case characters. (See Information on the design settings) |
| Refresh | Refresh rate. Here you have to enter a key whose code you take from the start-up software HomeServer Expert under Project/Times, e.g. R3. (See Information on the design settings) Note First test the behaviour with long refresh rates when accessing via the Internet. |
| Icons und Bilder lokal cachen / Local caching for icons and pictures | Activated: On the initial access with the profile created here, all graphics files are saved locally in a subdirectory of the client program. The program uses the graphics files stored here for further accesses. This reduces the volume of data to be transferred. If graphics files have changed on the HomeServer, this is recognised by the client program. Changed data is automatically adopted and stored locally. The old data is overwritten in the process. |
| Kamera und Diagramme synchron laden / Synchronous loading cameras and diagrams | Activated: The camera image and graphs are synchronously loaded on the visualisation page, i.e. the visualisation is not displayed until the graphs and camera images have been loaded. Deactivated: The visualisation page is displayed immediately, the graphs and camera images, however, are not displayed until they have been loaded. |
| OK | Saving the HomeServer profile. Return to the HS/FS list window. The name of the HomeServer whose profile you have created here is added to the list. |
| Abbruch/Cancel | Cancellation of the profile entry. All data entered is discarded. |
2.6.Information on the design settings
In the HS/FS window of the client program, you have to enter the key of the design under Design. To find out the key for the design, open the project belonging to the HomeServer in the Expert software (applies equally to the HomeServer and FacilityServer). Select Project settings/Interface/Designs (see Fig. 2.9).
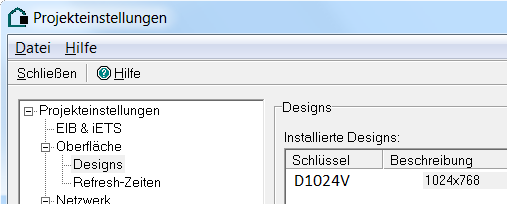
Fig. 2.9: Key of the design
In addition, you must enter a key for the refresh rate in the window HS/FS of the client program under Refresh. To find out the key, open the project belonging to the HomeServer in the Expert software. Select Project settings/Interface/Refresh times (see Fig. 2.10).
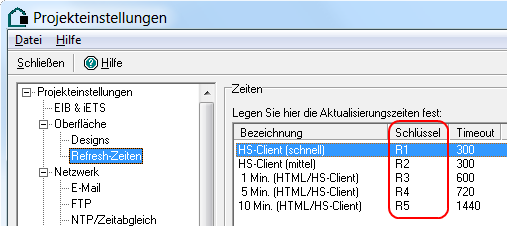
Fig. 2.10: Key for the refresh rate
Double-clicking in the list (see Fig. 2.10) opens the window Edit/Add (see Fig. 2.11).
Activation of access with the client program
Activate the option Use in client program to enable access to the HomeServer with the client program.
Fig. 2.9: Key of the design
In addition, you must enter a key for the refresh rate in the window HS/FS of the client program under Refresh. To find out the key, open the project belonging to the HomeServer in the Expert software. Select Project settings/Interface/Refresh times (see Fig. 2.10).
Fig. 2.10: Key for the refresh rate
Double-clicking in the list (see Fig. 2.10) opens the window Edit/Add (see Fig. 2.11).
Activation of access with the client program
Activate the option Use in client program to enable access to the HomeServer with the client program.
2.7.Program start via parameter transfer
The client program can also be started via parameter transfer. Program start via the login mask can then be omitted.
Note: Different mask layout.
Please note that the layout of the screen masks displayed below may vary slightly depending on the Windows operating system. The masks displayed were created under Windows 7 Ultimate.
To start the client program via parameter transfer, first create a corresponding link on the Desktop. Proceed as follows:
- Move the mouse pointer to a free position on your Windows screen (Desktop).
- Open the context menu (right-click).
- Select New/Create link. The window Create link (1) is opened (see Fig. 2.12). You have to enter the data path here.
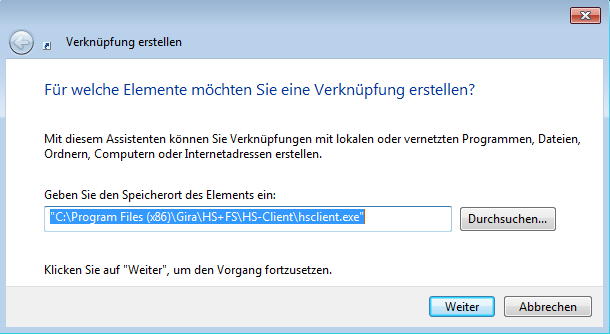
Fig. 2.12: Creating a link
- Click on Browse and select the file hsclient.exe. You can find the exact storage location of the file from the "Readme" file included with the Expert software (there is a link to this in the Start menu).
- Click on Next. The window Create link (2) is opened (see Fig. 2.13). You have to enter a name for the link here.
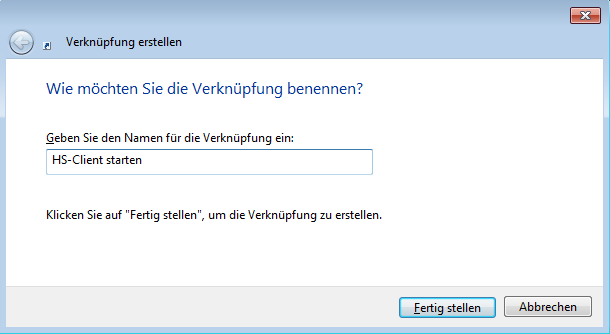
Fig. 2.13: Name of the program link
- Specify a name for the link.
Here, you should select a "meaningful" name for the link. (e.g. Start HS client) - Click on Complete. The link symbol appears on your Desktop. Double-click on the symbol to start the client program.
- Move the mouse pointer to the link symbol for the client program.
- Open the context menu by right-clicking on it.
- Select Properties. The window Run properties of HS client is opened. Select the Link tab (see Fig. 2.14).
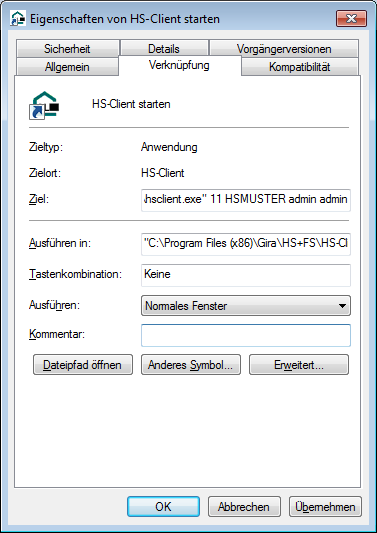
Fig. 2.14: Properties of the program link
- The path specification including the name of the program in the line Target is automatically enclosed in quotation marks, e.g. "C:\Prog\hsclient.exe". If this is not the case, please change this accordingly.
After this expression, i.e. outside the quotation marks, enter the parameters, separated by spaces, with which the client program is to be started. A list of the parameters can be found under List of the possible parameters. - Click on Apply. The new settings will be saved.
- Click on OK. The window is closed.
Note: Several links on the Desktop.
You can create any number of links for your client program.
In conjunction with parameter transfer, this enables you to quickly change between different designs, refresh rates, HomeServers or FacilityServers and users.
In conjunction with parameter transfer, this enables you to quickly change between different designs, refresh rates, HomeServers or FacilityServers and users.
The next time the client program is started via the link on your desktop, the parameters you specified are taken into account.
2.7.1.List of possible parameters
The following contains an overview of the possible parameters.
Important
The parameters 1-4 must always be specified at least so that login only works with parameter transfer without display of the login mask!
Important
The order of the parameters must be observed!
| Parameter no. | Parameter | Description |
|---|---|---|
| 1 | [frame, position, in foreground] | Positioning of the client on the screen. Positions must always be 4-digit. Free positions must therefore be filled with leading zeros. If all options of the first parameter is used, a 10-character long parameter is produced.
|
| 2 | [Key] | Key for the selected HS. The key corresponds to the ID in the settings for an HS/FS (see Fig. 2.8). |
| 3 | [User name] | Login name of the user. The user name as it must be entered in the login mask (see Fig. 2.6). |
| 4 | [Password] | User's password. The password for the above-mentioned user as it must be entered in the login mask (see Fig. 2.6). |
| 5 | "validatecert" [".pem" file] | Certificate check. The certificate stored in the HS/FS is checked. If it is valid, login is carried out. If it is invalid, login is not carried out! A ".pem" file can be specified as an option. This is used as a root certificate when the certificate of the HS/FS is checked. |
Examples of parameters:
| Entries | Example | Comment |
|---|---|---|
| Parameters 1-4 | "c:\[Path for HS client directory]\hsclient.exe" 1100550077 HSEXAMPLE admin admin | The HS client is displayed with a frame and always in the foreground, at a distance of 55 from the left and 77 pixels from the edge of the screen. If the login data is correct, a login mask is not displayed here; the start-up screen of the project is displayed directly. |
| Parameter "validatecert" | "c:\[Path for HS client directory]\hsclient.exe" validatecert | The login mask is displayed first in any event. If the HS selected in the login mask has a valid certificate, the start-up screen of the project is displayed. Otherwise, the project can not be started even if the correct login data was entered. |
| Parameter "validatecert" with specification of a ".pem" file | "c:\[Path for HS client directory]\hsclient.exe" validatecert my_cert.pem | The login mask is displayed first in any event. To ensure that the start-up mask is displayed, all login data must be correctly specified and a valid certificate must be installed on the HS/FS, signed by " my_cert.pem".Note If the file " my_cert.pem" is not in the directory of the HS client, you have to specify the complete path. |
Important
Login only with parameter transfer requires at least the specification of parameters 1-4! Otherwise, the login mask will be displayed!
2.8.Exiting the running client program
To exit the client program again, you have to use the key combination ALT+F4 if the display "without frame" is used.
With the display type "with frame" you also have the option of ending the client program by clicking on the close symbol of the window in the top right-hand corner (see Fig. 2.15).
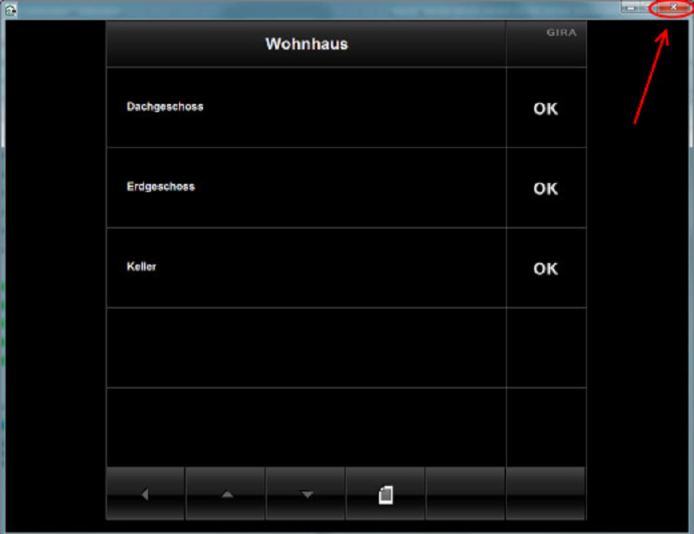
Fig. 2.15: Exiting the client program using the close symbol
With the display type "with frame" you also have the option of ending the client program by clicking on the close symbol of the window in the top right-hand corner (see Fig. 2.15).
Fig. 2.15: Exiting the client program using the close symbol