This is a description of the procedure for updating the firmware with the help of a serial cable via the HS+FS firmware update program.
Warning
From Expert / firmware v2.10, this program must be used if you want to transfer the firmware to an HS/FS via a serial cable, as the batch files used up to now no longer work!
You can also use the corresponding function in the HS/FS Expert.
You can also use the corresponding function in the HS/FS Expert.
Note
Older firmware versions can also be transferred to corresponding HS/FS via a serial cable with this program.
1.Requirements
- You are using Expert v2.10 (or higher). Only then will this program have also been installed when HS/FS Expert is installed.
- A serial cable (9-pole)
- Microsoft® Windows XP or a newer Windows operating system
2.Procedure
- Recommended: Back up the retentive data of the HS/FS.
- Switch the HS/FS off.
- Connect your PC to the HS/FS using a serial cable.
- Start the HS+FS firmware update program (fwupdate.exe).NoteThis can be found in the start menu of the HS/FS Expert (from v2.10) in the Tools section.
- You see the following user interface:
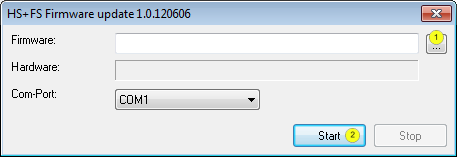
- Click on the button (1).
- Select the desired firmware file (usually "firmware.dat").NoteYou can find the current firmware in the subfolder of the Expert subdirectory “firmware” valid for your HS/FS.
- The program shows the complete path to the selected firmware in the "Firmware" field.
- The program recognises the hardware type which the selected firmware is intended for and indicates it in the "Hardware" field.
- Ensure that the firmware which you want to transfer has the hardware type which is suitable for the connected HS/FS.
- Select the COM port where you have connected the serial port to your PC (normally it is COM1).
- Click on the button (2).
- New information appears on the user interface:
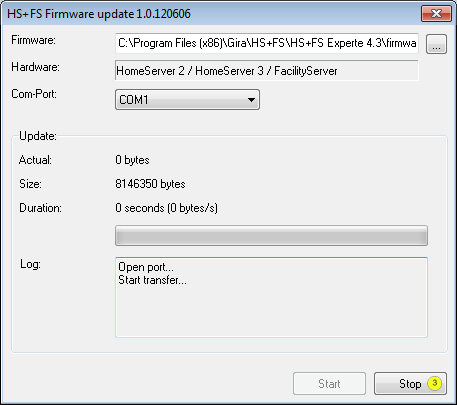
Actual The current number of bytes already transferred to the HS/FS Size The total number of bytes to be transferred to the HS/FS Duration The previous duration of the transfer and the average transfer rate Log Status information - Switch the HS/FS on.
- The transfer begins after a few seconds.
- You can cancel the transfer at any time by clicking the button (3)(Not recommended).
- Now close the HS+FS firmware update program.
- You can now remove the serial cable.