1.Introduction
For easier reading, only the term HomeServer (HS) will be used in this description. All information relating to the Gira HomeServer applies both to the Gira HomeServer and to the Gira FacilityServer. Properties and functions relating specifically to the Gira FacilityServer will be marked accordingly.
In general, the difference between the Gira FacilityServer and the Gira HomeServer is that the Gira FacilityServer has a 19" frame, and can also therefore be installed in a server cabinet. An additional internal fan ensures that the internal temperature doesn't get too high. The Gira FacilityServer also has a larger RAM than the Gira HomeServer.
In general, the difference between the Gira FacilityServer and the Gira HomeServer is that the Gira FacilityServer has a 19" frame, and can also therefore be installed in a server cabinet. An additional internal fan ensures that the internal temperature doesn't get too high. The Gira FacilityServer also has a larger RAM than the Gira HomeServer.
1.1.Properties
The Gira HomeServer is a gateway for visualising and controlling the complete electrical installation of buildings, provided that these are equipped with the KNX system. These can be both private and company buildings.
The KNX functions can be monitored and controlled at any time and from everywhere, externally and internally. The monitoring and control takes place using the latest communication media, e.g. PC, smartphone, TV with Internet connection or another mobile end device with an Internet browser, and the functions are called up and visualised via the Gira iPhone HomeServer app, the Gira iPad HomeServer app or the Gira Android HomeServer app, for example. Malfunctions, measured values and actuator and sensor states can likewise be transmitted via the respective app or by text message or email. Acknowledgement is via the app interface, KNX or telephone. Notifications can also be sent to mobile end devices via push notification.
A graphical user interface ensures easy operation: Building or device states are visualised with icons and texts that can be positioned freely. Each user can save their own visualisations and menu structures.
[b] In addition, the HomeServer has a free text and symbol-based menu structure. User groups are also available. The HomeServer can be connected to an Ethernet network. Network cameras can also be connected via a network so that images can be displayed in visualisations. The images can also be recorded. All archived data and images can be forwarded via email and in some cases via FTP.
1.2.General information on the operating instructions / product support
The information, data, values, etc. contained in these documents may be changed without prior notification. The illustrations are likewise subject to change.
Subject to technical modifications!
Subject to technical modifications!
Note: Up-to-date information is available on the Gira website.
As the software for the device purchased by you is being continuously further developed and updated, information in this manual may no longer be up-to-date.
The latest product information is always available on the Gira website:
http://www.gira.de
The latest product information is always available on the Gira website:
http://www.gira.de
or
http://www.gira.com
Current software updates and documentation on your product are also available at http://www.download.gira.de or http://www.download.gira.com.
http://www.gira.com
Current software updates and documentation on your product are also available at http://www.download.gira.de or http://www.download.gira.com.
1.3.Scope of supply
The following items are included in delivery:
- 1 x HomeServer
- 1 x mains cable
- 1 x start-up cable
- 1 x start-up manual
1.4.Interfaces and connection options
The HomeServer has the following interfaces and connection options:
- Mains voltage connection 230 V
- RS232 interface for KNX and programming
- Network connection for RJ45 Cat 5 Ethernet TCP/IP
- ISDN via accessory USB-ISDN adapter / Art. No. 209300
- 4 x USB connection (e.g. for USB-KNX interface, order no. 1080 00 or 1070 00 or USB-ISDN adapter, order no. 2093 00)
1.5.System requirements
To operate the HomeServer, a functional KNX system is required. Communication with the KNX devices as well as complete monitoring of all events is via the KNX.
The HomeServer is programmed via the Expert software, which is available free of charge in the download area of the Gira website. This software can be operated on a standard PC with the Microsoft® Windows operating system.
1.6.Area of application
The HomeServer is set up in buildings, in rooms with "normal" humidity and room temperature. Use of the HS in damp cellars, for example, may negatively affect the functionality of the device. The device is used for monitoring, visualisation and controlling KNX systems. The software made available in the download area of the Gira website may only be used together with the HomeServer.
Any other use of the device and software is not permitted. Gira neither assumes legal responsibility nor provides any form of guarantee for errors or damage of any kind resulting from the improper use of the device or associated software.
Any other use of the device and software is not permitted. Gira neither assumes legal responsibility nor provides any form of guarantee for errors or damage of any kind resulting from the improper use of the device or associated software.
1.7.Registration
Please register your device at geraeteportal.gira.de oder deviceportal.gira.com. As a registered user, you will be able to use services and functions including giradns (service providing secure online access to your HomeServer), weather forecasts, push notifications (the transmission of HomeServer notifications to your mobile end device), etc. In addition, you will receive technical support and regular information about downloads, updates (further developments), additional modules and training offers.
1.8.Updates
Updates eliminate technical problems (bug fixing), and also close possible security gaps. External attacks are possible as soon as your HomeServer communicates with the internet. Because these forms of attack change constantly, new updates for the HomeServer may be required for permanent protection. You should therefore check the Gira website regularly to see whether any new updates are available for the HomeServer firmware. You can also take steps of your own to increase security by using a new, individual password for each HomeServer and each service.
Please note that Gira assumes no legal responsibility and provides no guarantee of any kind for problems resulting from obsolete firmware or updated firmware.
Please note that Gira assumes no legal responsibility and provides no guarantee of any kind for problems resulting from obsolete firmware or updated firmware.
Important: Make sure to install the updates!
Please make sure to download the firmware updates from the Gira websites and install them on your HomeServer, even if you are not registered! Follow the information in these installation instructions. The installation instructions can be found online on the Gira website.
Important: Save retentive data before updating the firmware!
Make sure to save the data in the retentive memory of the HomeServer before updating the firmware.
The backup is carried out via the Expert software. Follow the information in the Expert software's help function.
The backup is carried out via the Expert software. Follow the information in the Expert software's help function.
2.Start-up and installation
In order to start up the HomeServer, two subject areas must be differentiated:
- Set-up and connection of the HomeServer
- Function test and start-up
Important: Start-up only to be carried out by an electrical professional!
Connection and start-up of the device may only be carried out by trained electrical professionals.
Important: Check the current software version before installing!
Make sure to check the current software version of the firmware and Expert software before you install and start up the HomeServer. If necessary, download the latest data from the Gira website.
Address: http://www.gira.de or http://www.gira.com
2.1.Basic configuration of the HomeServer in the sample project
To start up the HomeServer, you first need your start-up computer, on which you have created your KNX project in the ETS for example. Install the HomeServer Expert software on this computer. Create your HomeServer project with all necessary functions in this software. The data can then be transferred to the HomeServer via a direct connection or a network connection from the start-up PC.
The HomeServer already has a sample project in its default delivery state. With this sample project the HomeServer has an IP address and a net mask. The user interface is designed for a screen resolution of 1024 x 768. The project is intended to be accessed via the local network. Although access via the internet is not planned, it can be set up quickly if required.
You can find out which users and passwords are saved in the sample project and which lists can be called up at Function test via Internet browser.
2.2.Device description
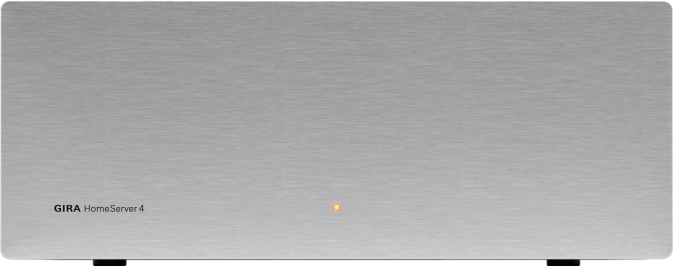
Figure 2.1: Operating and control elements on the front of the HomeServer:
Control elements on the front of the HomeServer and FacilityServer:
- Operating LED that lights up when the device is switched on.
- Reset button: The FacilityServer is restarted without power interruption.
Note: The HomeServer is switched on via the ON/OFF switch.
If the HomeServer is switched on via the ON/OFF switch, three double signal tones are heard when the HomeServer is ready for operation.
Please note that the time period for the starting the HomeServer may significantly increase depending on the project size (how many KNX objects must be scanned).
Please note that the time period for the starting the HomeServer may significantly increase depending on the project size (how many KNX objects must be scanned).
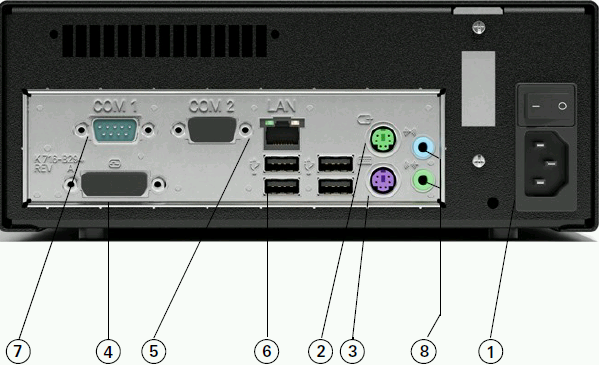
Figure 2.2: Interfaces on the rear of the HomeServer
Interfaces on the rear of the HomeServer:
- Mains connection 230 V (1) and ON/OFF switch
- PS2 connection for mouse (2), without function
- PS2 connection for PC keyboard (3), for service purposes
- DVI connection for PC monitor (4), for service purposes
- RJ45 network connection (5)
- USB ports (6), connection option for KNX interface (order no. 1070 00 or 1080 00), USB-ISDN adapter (order no. 2093 00) and for USB keyboard (servicing purposes)
- RS232 interface for KNX and programming (7)
- Jack socket outlets (8), no function
Note: LED at the network connection
The network connection has a green and a yellow LED. Both LEDs light up or flash when there is a network connection to the HomeServer. The LEDs will only flash when the HomeServer is switched on. A valid IP address is not required.
2.3.Set-up and installation
The HomeServer may only be set up inside buildings. It is not intended and not permitted for mobile operation.
Set up the HomeServer at a central location so that connection to the mains voltage, to the network and the KNX is trouble-free. The location should also be "out of the way" so that the device does not impede other work being done and so that one of its connections cannot be accidentally interrupted.
Set up the HomeServer at a central location so that connection to the mains voltage, to the network and the KNX is trouble-free. The location should also be "out of the way" so that the device does not impede other work being done and so that one of its connections cannot be accidentally interrupted.
Note: Selecting the set-up location.
Select a set-up location where you can be sure that other work will not cause the mains supply, network connection or KNX connection to be interrupted.
Note: Sufficient air circulation.
In order to ensure permanent functionality of the HomeServer, a set-up location should be chosen that has sufficient air circulation around the device, enabling operation at room temperature.
2.3.1.Connection to the mains voltage
The HomeServer is connected via the power supply unit to the mains voltage (230 V~).
Important: Device starts up immediately when connected to mains voltage!
The HomeServer starts as soon as it is connected to the mains voltage and the ON/OFF button on the rear is switched on.
Important: Carry out lightning protection!
In order to avoid damage to the device, we highly recommend protecting the device from overvoltage in the mains cable, at the network connection, at the ISDN adapter and in the KNX voltage access using appropriate protective devices.
2.3.2.Connecting to a network
To integrate the HomeServer into an existing network, you will need a network switch and a network cable. Please note that the network switch and network cable are not included in delivery.
You establish a connection between the HomeServer and the network by connecting one end of the network cable to the network connection of the HomeServer and the other end to the network distributor for example. Please note that the HomeServer already has its own IP address and net mask in its default delivery state:
You establish a connection between the HomeServer and the network by connecting one end of the network cable to the network connection of the HomeServer and the other end to the network distributor for example. Please note that the HomeServer already has its own IP address and net mask in its default delivery state:
- IP address: 192.168.0.11
- Net mask: 255.0.0.0
Note: IP address of the HomeServer is already assigned in the network.
If the IP address of the HomeServer in an existing network has already been assigned to another network participant, the IP address can be changed only in the Expert software. In this event, please contact your system administrator so that you can be assigned a free IP address for the HomeServer.
Note: Changing the IP address of the HomeServer.
If the HomeServer has already been in operation in your network with the factory pre-set IP address and it was then changed at a later time, the HomeServer may not be recognised in your network at first. In this event, switch the HomeServer off briefly and then on again.
Please note that it may take several minutes until the complete network recognises the new IP address.
Please note that it may take several minutes until the complete network recognises the new IP address.
2.3.3.Connection to the KNX
The HomeServer can be connected to the KNX system using the following KNX devices (not included in delivery):
- KNX bus coupler
- KNX data interface (order no. 0558 ..)
- KNX IP router (order no. 2167 00)
- USB data interface (order no. 1080 00)
- USB data interface (order no. 1070 00)
Note: iETS programming.
If the iETS is activated in the HomeServer, the ETS can use the interface connected to the HomeServer as a programming interface.
2.3.4.Direct connection to a laptop or PC
You can also connect the HomeServer directly to your start-up PC via LAN if it has a network connection. For older PCS, it may be necessary to used a "rotated" network cable (e.g. crossover cable with two RJ45 plugs). This cable is not included in delivery. A standard network cable can be used for up-to-date PCs and laptops.
The HomeServer has its own IP address and net mask in its default delivery state:
Information on how to access the HomeServer user interface after connecting it directly to your PC via the network connection is available at Function test via Internet browser or in the operating instructions for the client program (available online and in the Expert software's help function).
The HomeServer has its own IP address and net mask in its default delivery state:
- IP address: 192.168.0.11
- Net mask: 255.0.0.0
Information on how to access the HomeServer user interface after connecting it directly to your PC via the network connection is available at Function test via Internet browser or in the operating instructions for the client program (available online and in the Expert software's help function).
2.3.5.Connecting the HomeServer to ISDN
To connect the HomeServer to your ISDN system, use the USB-ISDN adapter.
-> Accessory (Art. No. 2093 00)
The USB and ISDN connection cables are included in the delivery of the USB-ISDN adapter.
The length of the supply cable must meet the ISDN specification.
-> Accessory (Art. No. 2093 00)
The USB and ISDN connection cables are included in the delivery of the USB-ISDN adapter.
The length of the supply cable must meet the ISDN specification.
2.3.6.Connecting the HomeServer for programming
The connection options for the HomeServer described up to this point were for simple, fast user access to the device. In this way you can test the functionality during initial start-up.
However, if the HomeServer is to be used professionally, it must be prepared (programmed) for its application area. You should carry out this programming using the Expert software (see Expert software). You install the software on your start-up PC and can then connect this with the HomeServer either directly or via a network. The programmed data is then transferred from the start-up PC to the HomeServer.
To connect the start-up PC to transfer data from the Expert software, proceed as follows:
- Disconnect the HomeServer from the KNX (if connected). This only applies if the HomeServer is not connected to the KNX via USB or KNXnet/IP routing (EIBnet/IP routing).
- Connect one end of the start-up cable included in delivery to a COM interface of your PC.
- Connect the other end of the start-up cable to the RS232 interface of the HomeServer.
Note: Programming via RS232 interface.
The RS232 interface of the HomeServer is solely for programming and connecting to the KNX. For programming, connect the start-up PC to the HomeServer with the start-up cable included in delivery.
2.4.Function test and start-up
In order to start up the HomeServer, two subject areas must be differentiated:
- Set-up and connection of the HomeServer.
- Function test and start-up.
Important: Start-up only to be carried out by an electrical professional!
Connection and start-up of the HomeServer may only be carried out by trained electrical professionals.
2.4.1.Function test via Internet browser
The HomeServer already has a sample project in its default delivery state. Four users have been saved in this sample project. You can log into the HomeServer using their login data. The user interface is pre-set for a screen resolution of 1024 x 768. The project is intended to be accessed via the local network. Although access via the internet is not planned, it can be set up quickly if required.
Note: Security
For security reasons, no passwords have been permanently entered in the sample project. Before you can transfer the project to the HS/FS, you have to create passwords for these users yourself.
- admin
- u1
- u2
- u3
To access the user interface of the HomeServer, using the address bar of the Internet browser call up the page
https://<HomeServer IP address>/hs
. Then enter one of the above-mentioned user names and the password you defined for this user in order to access the user interface.
To access lists, using the address bar of the Internet browser call up
https://<HomeServer IP address>/hslist
. Under HS IP address, specify the defined IP address of the HomeServer (192.168.0.11) unless you have changed this.
The following lists can be called up:
| hslist | List name |
|---|---|
| login | Login protocol |
| debug | Debug page |
- Connect the HomeServer via its network connection either to the local network or directly to the start-up PC (see Connecting to a network).
- Connect the HomeServer to a power supply (see Connection to the mains voltage).
- Switch the HomeServer on (if not already switched on).
- Start your Internet browser on your start-up PC or on a PC connected to the local network.
- Enter https://192.168.0.11/hs into the address bar of your browser. The number combination in the address bar is the IP address of the HomeServer. The login screen will appear in the browser window.
- In the login mask, enter one of the pre-set users (e.g. u1) and the password you defined for this user. The page is reloaded with Refresh.
- Click on Log in. The user interface of the HomeServer will open.
Note: Pre-set IP address.
The number combination that you specify in the address bar is the IP address of the HomeServer. If you have changed the IP address of the HomeServer specified by the sample project, you must enter the modified address as described in section 5.
2.4.2.Function test via the HSClient program
The user interface of the HomeServer can also be accessed by the HSClient program. Access via the HSClient program is described in the corresponding operating instructions.
2.4.3.Start-up
After you have completed the function test, you can start up the HomeServer for a new project. The following description refers to start-up via serial connection between the start-up PC and the HomeServer. After initial start-up, the HomeServer can also be programmed via a LAN connection.
Start-up should be carried out as follows:
Start-up should be carried out as follows:
- Install the Expert software on your start-up PC (see Expert software").
- Create a new project in the Expert software.
- In the Expert software, program the functions and tasks for which your HomeServer will be used in your project. Use the online help in the program for help with the procedure and for further support.
- Disconnect the HomeServer from the power supply (if necessary).
- Disconnect the HomeServer from the KNX (if necessary).
- Connect the HomeServer to the start-up PC with the start-up cable included in delivery (see Connecting the HomeServer for programming).
- Connect the HomeServer to the power supply again (see Connection to the mains voltage).
- Switch the HomeServer on (if necessary).
- Transfer the data from the Expert software from your start-up PC to the HomeServer.
- Disconnect the HomeServer from the start-up PC.
- Connect the HomeServer to the KNX, to the local network, etc. (see Set-up and installation).
3.Operation via the Gira device portal
You can configure and register your HomeServer in the Gira device portal.
As part of the configuration you can set up an online access and Dynamic DNS for example, create access rights for third parties, and subscribe to the weather service.
By registering your HomeServer, you will receive information on a range of items including downloads, updates, and free supplementary modules such as the Gira Dynamic DNS or the weather forecast.
You can also manage other Gira devices in addition to your HomeServer here.
More information (including information on the login procedure) is available directly in the portal:
geraeteportal.gira.de
or
deviceportal.gira.com
3.1.Switching language in the device portal
Depending which internet address you use to access the Gira device portal, the German version of the home page will open up.
However the portal is also available in other languages. To be able to access the portal in your own language, you need to switch the language setting:
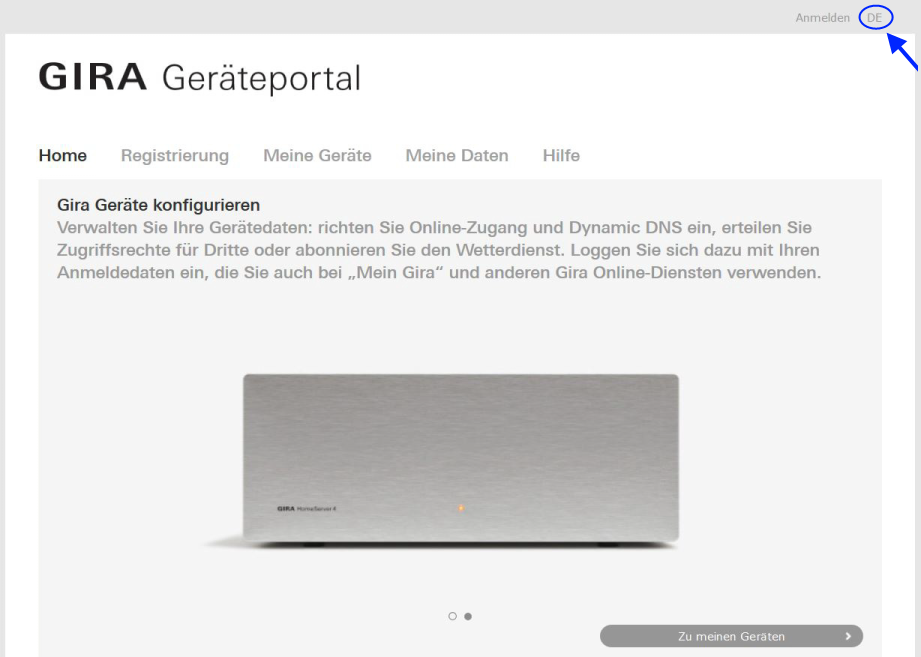
Figure 3.1: Device portal home page
Click on 'DE' at the top right of the portal home page. A page for selecting the possible language variants will open.

Figure 3.2: Column with available columns
In the column on the left-hand side, click on the language that you wish to use. The home page of the device portal will be opened in the desired language.
To register or configure Gira devices in the device portal, please follow the instructions in the Gira device portal.
However the portal is also available in other languages. To be able to access the portal in your own language, you need to switch the language setting:
Figure 3.1: Device portal home page
Click on 'DE' at the top right of the portal home page. A page for selecting the possible language variants will open.
Figure 3.2: Column with available columns
In the column on the left-hand side, click on the language that you wish to use. The home page of the device portal will be opened in the desired language.
To register or configure Gira devices in the device portal, please follow the instructions in the Gira device portal.
4.Expert software
This section explains how the HomeServer can be started up using the Expert software.
Important: Start-up only to be carried out by an electrical professional!
Connection and start-up of the device may only be carried out by trained electrical professionals.
In the Expert software, the HomeServer is configured and e.g. the user interface and visualisation are created. This data must be transferred to the HomeServer.
Data can be transferred from the start-up PC to the HomeServer via
The individual connection options of the HomeServer are described at Start-up and installation.
Data can be transferred from the start-up PC to the HomeServer via
- the start-up cable (direct connection from PC to HomeServer)
- Network
- ISDN direct dial-in
- Internet
The individual connection options of the HomeServer are described at Start-up and installation.
4.1.Installing the Expert software
The Expert start-up program is available free of charge in the download area of the Gira website. This software must be installed on your start-up PC.
Important: Check the current software version before installing!
Be sure to check the current software version of the firmware and Expert software if you already have this software. If necessary, download the latest data from the Gira website.
Address: http://www.gira.de or http://www.gira.com
How to install the Expert software:
How to start the Expert software following successful installation:
- Download the latest software package for the HomeServer to your start-up PC from the Gira website.
- Unpack the downloaded zip file.
- Run the executable file Gira Expert Setup v[version number].exe. The installation program will begin.
- Follow the instructions of the installation program.
How to start the Expert software following successful installation:
- In the Windows 10 start menu, click on Gira under the letter G in the alphabetically sorted list. All previously installed Expert versions in the respective language variants can be found in this folder.
4.2.Changing the pre-set IP address
Normally it is not necessary to carry out changes in Expert for the function test or initial start-up. But they can be carried out relatively simply with the sample project already created in the HomeServer.
However, if you wish for example to integrate the HomeServer into an existing network in which the preset IP address 192.168.0.11 has already been assigned to another network participant, the HomeServer IP address can be changed at a later time.
However, if you wish for example to integrate the HomeServer into an existing network in which the preset IP address 192.168.0.11 has already been assigned to another network participant, the HomeServer IP address can be changed at a later time.
Note: Changing the network settings.
Changes to the network settings of the HomeServer or your local network must always be coordinated with your network administrator and implemented by the administrator if necessary.
How to change the HomeServer's IP address:
- Create a new project in the Expert software.
- Under Master data select the item Project\Network.
- Enter the HomeServer's new IP address in the Own IP line.
- If applicable, change the information in the Network mask line.
4.3.Programming the HomeServer via the RS232 connection
How to transfer the changed data directly from the start-up PC to the HomeServer:
- Disconnect the HomeServer from the KNX (if necessary).
- Connect the serial (RS232) port of the HomeServer to a COM port of the start-up PC. Use the start-up cable included in delivery for this purpose.
- Start the Expert software on your start-up PC. Open the sample project with the changed IP address (if necessary).
- Select Transfer. The Transfer project window will open.
- Select Via serial port.
- Enter the number of your serial port (e.g. 1) next to Serial port.
- Under Transfer mode, activate Transfer images+data+voice messages.
- Switch off the HomeServer. Click on Start. Switch the HomeServer on again.
- After the data has been transferred, disconnect the direct connection between the HomeServer and the start-up PC.
- Connect the HomeServer to the KNX.
4.4.Programming the HomeServer via LAN
How to transfer the changed data from the start-up PC to the HomeServer when both devices are interconnected via a local network:
- Start the Expert software on your start-up PC. Open the sample project with the changed IP address (if necessary).
- Select Transfer. The Transfer project window will open.
- Select Via network.
- Select Different address and enter the current IP address and the port next to Different address.
- Under User data for login enter the user name (e.g. admin) and the password you assigned.
- Under Transfer mode, select Transfer images+data+voice messages.
- Click on Start. The data is transferred to the HomeServer via the network.
- Open the sample project via your internet browser or via the client program. The start page is available after 3 double signal tones are heard.
Note: Changing the IP address in the HomeServer.
If the HomeServer has already been in operation in the current network with the factory pre-set IP address and it was changed at a later time, the HomeServer may not be recognised in your network at first. In this event, switch the HomeServer off and then on again.
If the HomeServer is ready for operation, it signals this acoustically via three double signal tones. Please note that it may take several minutes until the complete network recognises the new IP address.
If the HomeServer is ready for operation, it signals this acoustically via three double signal tones. Please note that it may take several minutes until the complete network recognises the new IP address.
4.5.Further work with the Expert software
If you have successfully completed the function test or initial start-up of the HomeServer, you can then program the HomeServer for the special tasks of your project. Expert is used for this.
For programming, using the sample project included in delivery and modifying the requirements accordingly is not recommended.
Simply create a new project and progress step-by-step through the individual menu items and input screens in the Expert software. Context-sensitive online help offers you support.
After successful programming in Expert, transfer the data to the HomeServer. The project is permanently saved there.
5.Important IP addresses
Your HomeServer can mainly be operated via the internet, but also via a network connection. Here is an overview of the most important IP addresses. The following applies here:
192.168.0.11 (IP address of the HomeServer in its default delivery state)
or
nnn.giradns.com
- uuu = user name
- ppp = password
- hsn = name of the HomeServer in the portal
- ip address = IP address of the HomeServer
- nnn = Own "fixed" IP address, e.g. in the Gira device portal
192.168.0.11 (IP address of the HomeServer in its default delivery state)
or
nnn.giradns.com
5.1.Calling the user interface
| Address | Meaning |
|---|---|
| https://ip or https://ip/hshtm | Calling up the HomeServer user interface via an internet browser. A login screen appears. Entering the user name and password opens the user interface. |
| https://ip-Adresse/shs or https://ip-Adresse/shshtm | Calling up the HomeServer user interface via an internet browser in secure mode. A login screen appears. Entering the user name and password opens the user interface. The password is encrypted in the process. |
| https://ip-Adresse/hshtm?user=uuu&pw=ppp&cl=DES&ref=RRR The following applies: DES = Design (from: Expert/Project/Design) RRR = Refresh settings (from: Expert/Project/ Times) | Direct call-up of a user interface for a user without first running the login screen. |
| https://geraeteportal.gira.de or https://deviceportal.gira.com | Calling up the Gira device portal. A menu is displayed for the user to log in with login data saved in the HomeServer. |
| https://geraeteportal.gira.de/hslogin.php?hsname=hsn or https://deviceportal.gira.com/hslogin.php?hsname=hsn | Calling up the Gira device portal. Direct access to the HomeServer without the portal menu. The login data of the user must be stored in the HomeServer. |
5.2.Retrieving lists
| Address | Meaning |
|---|---|
| http://ip-address/hslist | Calls up the page for calling up lists. An input screen is displayed for entering the list name, user and password. |
| http://ip-address/shslist | Calls up the page for calling up lists in secure mode. An input screen is displayed for entering the list name, user and password. |
| https://ip-Adresse/hslist?lst=LLL&user=uuu&pw=ppp With: LLL = name of list | Calling up a list directly. Please note that the call-up for the specific list must be saved in the HomeServer and that the user must have rights to call up lists. |
5.3.Operating with WAP
| Address | Meaning |
|---|---|
| http://ip-address/hswap.wml | Calling up the HomeServer user interface in WAP browser mode. A login screen is displayed for the user to log in with login data saved in the HomeServer. |
| http://geraeteportal.gira.de/hswap.wml or http://deviceportal.gira.com/hswap.wml | Calling up the Gira device portal in WAP browser mode. A login screen is displayed for the user to log in with login data saved in the HomeServer. |
| http://geraeteportal.gira.de/hswap.php?hsname=hsn or http://deviceportal.gira.com/hswap.php?hsname=hsn | Calling up the Gira device portal in WAP browser mode. This is direct WAP access to the HomeServer without the login screen. |
5.4.Short explanation of important terms
| Term | Meaning |
|---|---|
| Gira device portal | Internet portal enabling access to the user interface of the HomeServer and other Gira devices. |
| giradns.com | Free-of-charge Internet service via which the HomeServer can be assigned a "permanent" name on the Internet. The HomeServer can then be accessed directly with the name created here. |