1. Introduction
The HomeServer AjaxVisu provides you with a browser-based operating interface for HomeServer or FacilityServer. The visualisation is implemented in HTML with the latest Ajax technology.
1.1. General information
The information, data, values, etc. contained in these documents may be changed without notice. The illustrations are likewise subject to change.
Subject to technical modifications!
Subject to technical modifications!
Note: Current information on the Gira Website
As the software for the device you purchased is being continuously further developed and updated, information in this manual may no longer be up-to-date. The latest product information is always available on the Gira website:
http://www.gira.de
Current software updates and documentation for your product are also available.
http://www.gira.de
Current software updates and documentation for your product are also available.
1.2. System requirements
The following is required for using the AjaxVisu:
- HomeServer or FacilityServer.
- Expert software version 2.2.071114 or higher (14/11/2007 or newer)
- HomeServer or FacilityServer firmware version 2.2.071114 or higher (14/11/2007 or newer)
- Control device with Internet browser (e.g. Windows PC or Apple computer)
1.3. Area of application
The HomeServer AjaxVisu expands the existing HomeServer/FacilityServer visualisation functions. Any other use of the device and software is not permitted. Gira shall assume neither legal responsibility nor a warranty of any kind for errors and damage resulting from the improper use of the device and/or the related software.
The Menu and Query areas are not included in the scope of the application.
2. AjaxVisu
2.1. Sample project
A sample project is included with the HomeServer/FacilityServer Expert software. The name of the sample project is:
Sample-yyyymmdd-av.de
Here "yyyymmdd" stands for the date of the respective file.
Sample-yyyymmdd-av.de
Here "yyyymmdd" stands for the date of the respective file.
2.1.1. Scope of sample project
The sample project has a resolution of 1024 x 768 in full-screen mode. The following visualisation masks are available:
- UTC
- Buddy list
- Value entry
- Date+Time entry
2.1.2. Several projects
If you work on several projects simultaneously and transfer them alternately to the HomeServer or FacilityServer, make sure you do the following:
Note
Always clear the cache from your browser every time you change projects!
Since you use the same file names in different projects, but the contents of these files may differ, the browser display may be incorrect if the browser accesses the cache instead of the current page and attempts to display the page of the same name from a different project.
2.2. HSAjaxFramework (tool)
HSAjaxFramework is a Windows tool that starts the MS Internet Explorer (IE). In the process, no control elements of the IE, e.g. navigation buttons etc., are displayed.
The window position, window size, edge width and window display can be set with parameters.
HSAjaxFramework can be called in two different ways: With or without parameters. The <key> described below can be transferred as a parameter. When called without parameters, a selection mask appears.
When a URL is entered in the selection mask, HSAjaxFramework starts in full-screen mode.
2.2.2. Location and scope
HSAjaxFramework can be found under tools\hsav-gira.
All parameters that can be set are created in the definition file list.hs (XML format).
Use a text editor for this purpose.
Use a text editor for this purpose.
The file consists of the following parameters (XML tags):
Parameter definition list.hs
Parameter definition list.hs
| Parameter | XML tag | Description |
|---|---|---|
| Section | <device> | A HomeServer or FacilityServer is defined within this XML tag. Several HS/FS can be defined in this file; each one with its own <device> XML tag. |
| Unique key | <key> | The program can be run with this parameter. In this case, all other parameters are automatically taken into account. Example: Code listing for <key> |
| Window size | <windowstate> | 0 = normal 1 = maximised |
| Window heading | <border> | 0 = without border (entire screen, no Windows bar) 1 = with border (window has a heading line and the Windows bar is visible) |
| Window display | <ontop> | 0 = normal 1 = window always in the foreground |
| Description | <text> | Designation of the HS/FS for the selection list in the program |
| URL for HS/FS call | <url> | Please note here that characters not compliant with XML must be masked. For example: "&" must be written as "&". |
| Horizontal window position when called | <pos_x> | Position at which the top left-hand corner of the window is located. (Right/Left) Only taken into account if <windowstate>=0. |
| Vertical window position when called | <pos_y> | Position at which the top left-hand corner of the window is located. (Top/Bottom) Only taken into account if <windowstate>=0. |
| Window width | <width> | Only taken into account if <windowstate>=0. |
| Window height | <height> | Only taken into account if <windowstate>=0. |
2.2.3. Example <key>
Source code list.hs:
<?xml version="1.0" encoding="ISO-8859-1"?>
<devices>
<device>
<key>Gira</key>
<text>Gira sample project</text>
<url>http://192.168.0.11/opt/hsav-gira/startgast.htm</url>
<windowstate>1</windowstate>
<border>1</border>
</device>
</devices>
<devices>
<device>
<key>Gira</key>
<text>Gira sample project</text>
<url>http://192.168.0.11/opt/hsav-gira/startgast.htm</url>
<windowstate>1</windowstate>
<border>1</border>
</device>
</devices>
2.2.4. Parameter transfer
The program can also be started with a parameter transfer.
If no parameter is transferred, a selection mask appears.
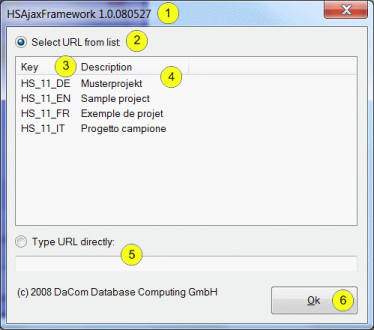
Fig. 2.1: Selection mask for parameter transfer
Fig. 2.1: Selection mask for parameter transfer
Description of elements of selection window
| Parameter | Digit | Description |
|---|---|---|
| Window heading | Item 1 | Name of the program with the version number. |
| Radio button | Item 2 | Click here to select an HS/FS from the list. |
| "Key" column | Item 3 | Unique key for the designation of an HS/FS. This value can also be transferred to the HSAjaxFramework as a parameter when called. |
| "Description" column | Item 4 | Brief description of the HS/FS. |
| Radio button | Item 5 | Click here to view a URL in the input field. Examples:
|
| OK button | Item 6 | Click here to confirm your entries. |
2.3. Start-up
2.3.1. Setup
Existing projects can be expanded to include the HomeServer AjaxVisu without an additional design. Open the Setup menu item in Expert. Create the following two symbols in the Project settings mask (see Fig. 2.2). The image ID is decisive for the definition.
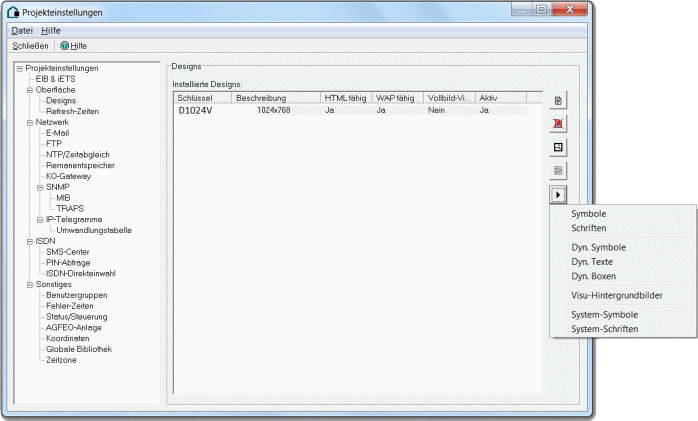
Fig. 2.2: Creating two symbols under "Project settings"
- Image ID: XXPAGE
- Image ID: XXPOPUP
Fig. 2.2: Creating two symbols under "Project settings"
Note: Do not create by copying or duplicating!
Please note that the two symbols cannot be created by copying or duplicating another symbol!
2.3.2. User rights
To use the HomeServer AjaxVisu, the users in question have to be granted access under
Users / User rights / Interface / Client program
.
Users / User rights / Interface / Client program
.
2.3.3. Page size
If the area of a standard visualisation page is to be limited, this is possible with the XXPAGE symbol. If this symbol is set on a visualisation page, it defines the bottom right-hand corner. All information which lies outside the limited area is not shown.
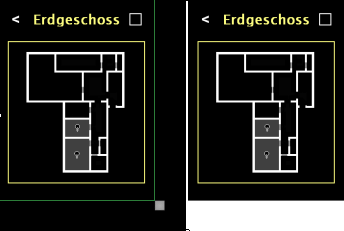
Fig. 2.3: Example for the setting of the page size
Create the symbol as described above:
Image ID: XXPAGE
Designation (name): "Ajax_Page_Size".
The symbol can be used as an option. If this symbol is not used, the browser shows the entire area of the visualisation page.
Using a small, square symbol is advisable. The top left-hand corner of the symbol defines the page size. The size and colour of the XXPAGE symbol are not significant, as it of course lies outside the defined display area.
2.3.4. Mask size and visualisation area
The largest HTML mask included with the sample project is 331 pixels wide and 240 pixels high.
If you define the size of the visualisation area with the XXPAGE symbol to be smaller than the size of the HTML masks, the HTML masks cannot be completely shown.
If you define the size of the visualisation area with the XXPAGE symbol to be smaller than the size of the HTML masks, the HTML masks cannot be completely shown.
2.3.5. Pop-up page
The HomeServer AjaxVisu offers pop-up visualisation pages.
If a visualisation page is to be laid over the visualisation page to be called (pop-up), it is possible with the XXPOPUP symbol. If this symbol is set on a visualisation page, it defines the bottom right-hand corner and at the same time it defines this page as a pop-up. All information which lies outside the limited area is not shown. The page is laid centred over the existing page when it is called.
Fig. 2.4: Creating a symbol for a pop-up.
Left: Draft of pop-up page. Right: Called pop-up in the visualisation.
Create the symbol as described above:
Image ID: XXPOPUP
Designation (name): "Ajax_PopUp".
Using a small, square symbol is advisable. The top left-hand corner of the symbol defines the page size.
In addition, the pop-up page should be surrounded by a transparent frame so that the border around the pop-up is no longer visible.
A mask (e.g. message archive) can be called from a pop-up page. However, it is not possible to call another visualisation or pop-up page within a pop-up page.
Therefore, a navigation element must be defined on each pop-up page (e.g.: "Navigation: Back" or "Navigation: Starting point"). A draft of the later pop-up can be seen together with the small red XXPOPUP symbol, which limits the area to be shown, in the left-hand image (see Fig. 2.4). The result which can then be seen as a pop-up in the HomeServer AjaxVisu is shown on the right.
With a pop-up page it is possible, for example, to implement device-specific pop-ups, e.g. a pop-up for blind control.
2.4. Start files
There are three start files:
- startgast.htm
- start2.htm (variant of startgast.htm)
- start3.htm (alternative to startgast.htm with different touch technology)
Code listing using the file startgast.htm as an example (see: Expert directory, under /hsupload/hsav-gira/):
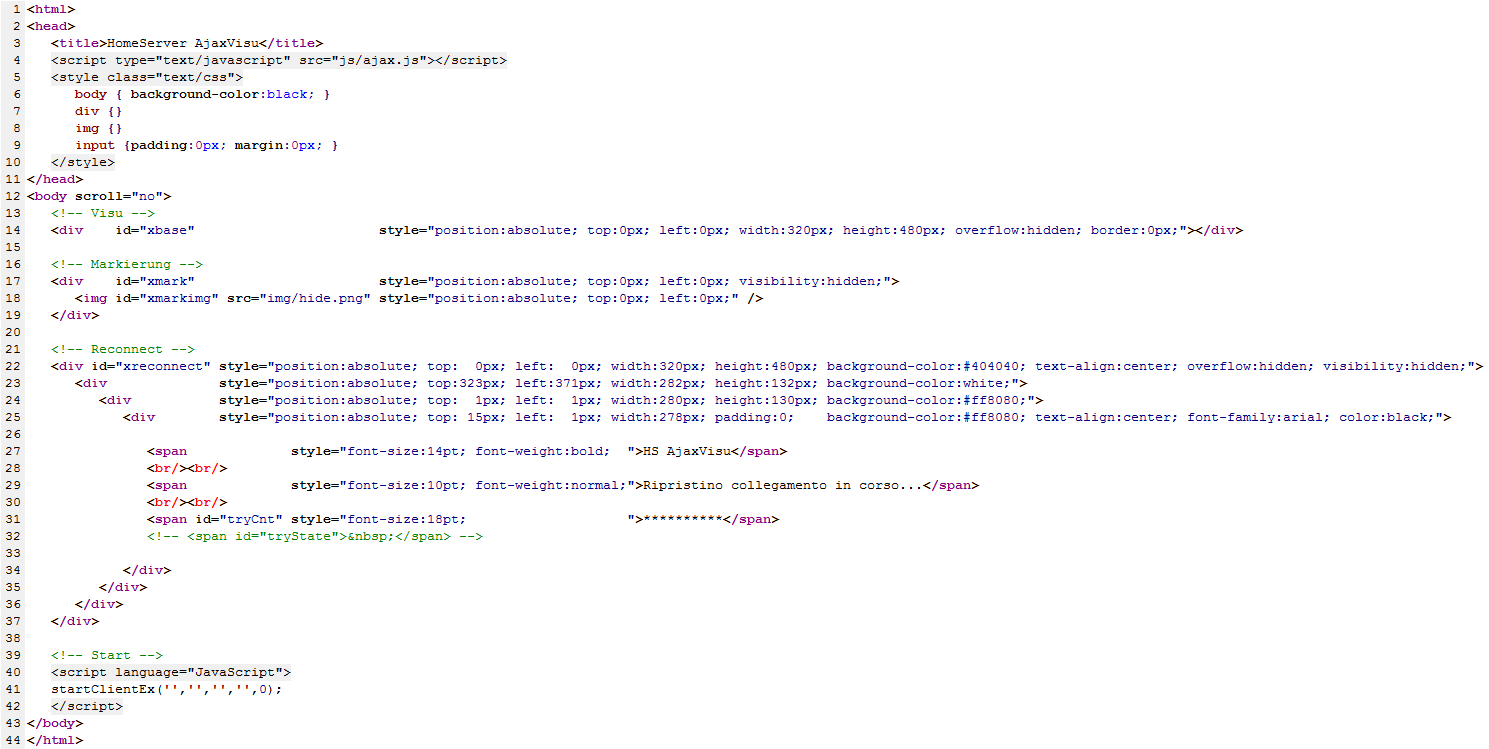
Explanations
The explanations refer to the setting options in this file. It is assumed that the standard HTML commands are known.
| Line | Explanation |
|---|---|
| 3 | Page heading or tab heading in the browser. |
| 5 - 10 | CSS settings for Login and Reconnect masks. |
| 6 | Background settings. Current: colour. |
| 14 | <div> "xbase". This container contains the entire visualisation. |
| 17 - 19 | <div> "xmark"with img "xmarkimg". The image entered here (img/hide.png) is required for the click display. |
| 22 | <div> "xreconnect". Container for the Reconnect-Display mask. |
| 23 - 36 | This <div> defines the message box in the Reconnect-Display mask. The <span> with the IDs "tryCnt" and "tryState" must be present, as otherwise it is possible to design freely with HTML here. |
| 40 - 42 | Client is started with JavaScript. Some things can be set: |
| 41 | Calls the client. In this line startgast.htm and start2.htm differ from each other. See the following chapter for additional information on this topic. |
2.5. Starting visualisation
The HomeServer AjaxVisu is started by calling the file startgast.htm in an Internet browser:
"https://IP_des_HS/FS/opt/hsav-gira/startgast.htm”
There are three call variants which can also be combined with each other:
The possible parameters for the call variants A and B are (in brackets the abbreviation for the call via variant B):
"https://IP_des_HS/FS/opt/hsav-gira/startgast.htm”
There are three call variants which can also be combined with each other:
- Modification of the included startgast.htm by permanently entering the information.
- Use of parameters, which you add on when calling in the browser
- Neither A. nor B.
Note: Any name can be assigned to the start file.
Of course, any desired name can be assigned to the start file (startgast.htm). However, you should retain the file extension (.htm) and not use any blank spaces.
- User (user)
- Password (pw)
- Design abbreviation (cl)
- Refresh time (ref)
- Login behaviour (not possible with variant B)
2.5.1. Call variant A
When using variant A, the parameters must be placed in single quotation marks and specified separated from each other with commas. Line 41 in the code listing.
Here is an example of the call variant A with permanently entered parameters in line 41:
startClientEx('admin','Alpha.123','D1024V','R1',1);
If all information is correct, the HomeServer AjaxVisu starts with the specified visualisation page. Otherwise, the Login mask is called.
Here is an example of the call variant A with permanently entered parameters in line 41:
startClientEx('admin','Alpha.123','D1024V','R1',1);
If all information is correct, the HomeServer AjaxVisu starts with the specified visualisation page. Otherwise, the Login mask is called.
Note: 5th parameter.
The 5th parameter can only be modified here; it does not exist as a call parameter.
Note: Permanently entered parameters are overwritten.
Permanently entered parameters are overwritten by call parameters (variant B)!
2.5.2. Call variant B
When using variant B, a question mark (?) is appended to the file name, which is then followed by the individual parameters (with abbreviations), each separated by an ampersand (&). Here is an example of call variant B with call parameters:
https://192.168.0.51/opt/hsav-gira/startgast.htm?pw=admin&user=admin&cl=D1024V&ref=R1
If all information is correct, the HomeServer AjaxVisu starts with the specified visualisation page. Otherwise, the Login mask is called.
https://192.168.0.51/opt/hsav-gira/startgast.htm?pw=admin&user=admin&cl=D1024V&ref=R1
If all information is correct, the HomeServer AjaxVisu starts with the specified visualisation page. Otherwise, the Login mask is called.
Note: 5th parameter.
The 5th parameter cannot be modified here; it does not exist as a call parameter.
Note: Permanently entered parameters are overwritten.
Permanently entered parameters (variant A) are overwritten by call parameters!
2.5.3. Call variant C
When using variant C, the file startgast.htm, is used as described in the Start files chapter and no parameters are added to the call.
The HomeServer AjaxVisu starts with the Login mask.
The HomeServer AjaxVisu starts with the Login mask.
2.5.4. Variant mix
You can also combine the different variants. For example, if you permanently enter only the design and the refresh rate in the start file, you can include the user and/or password as call parameters.
You can also enter all information permanently, as described in variant A. If you then also include individual (or all) parameters as call parameters, the permanently entered parameters will be overwritten by the call parameters!
If you have specified all parameters in one way or another, the HomeServer AjaxVisu starts with the specified page. Otherwise the Login mask in which all known fields (except the password) are shown already filled out is called.
2.5.5. Cookies
If, as described in variant A, not all parameters are entered permanently, the entries from the login are saved and the next time the Login mask is called, the fields are automatically pre-filled again in with this information.
Note: Overwriting parameters.
Permanently entered parameters overwrite the parameters saved in this way. Call parameters in turn overwrite permanently entered parameters!
2.5.6. Security
Since the login data is saved unencrypted for variant A, we recommend using this variant solely for users who have internal access authorisation only. Otherwise, it is possible for someone to obtain access to this file and misuse the data.
In general, it is recommended that at least the password not be permanently entered in the start file so that it is not saved in unprotected areas, but is instead requested on each login and each reconnection.
In general, it is recommended that at least the password not be permanently entered in the start file so that it is not saved in unprotected areas, but is instead requested on each login and each reconnection.
2.5.7. QuadClient
For installers, it is advisable to use variant B.
In the QuadConfig an entry is structured in the "Navigation button - URL" in such a way that a URL is stored there with call parameters (as described in variant B). Therefore no critical data is entered in the start file; the user of the QuadClient can, however, also log into the visualisation without an additional login procedure in this way.
In the QuadConfig an entry is structured in the "Navigation button - URL" in such a way that a URL is stored there with call parameters (as described in variant B). Therefore no critical data is entered in the start file; the user of the QuadClient can, however, also log into the visualisation without an additional login procedure in this way.
2.5.8. Reconnect and refresh
If the connection to the HS/FS is disconnected, e.g. due to restarting the HS/FS, a reddish information window with the heading "HomeServer AjaxVisu" and a note that an attempt is being made to re-establish the disconnected connection are displayed. This attempt at reconnection is repeated at intervals that are determined by the refresh time.
A number of asterisks are shown in the information window, each of which stands for a reconnection attempt already carried out.
As soon as the connection has been restored, the information window disappears.
In this case, the user returns to the page which was active before the connection failed.
Exception: Pop-up pages. The user returns to the page from which the pop-up page was called.
2.6. Login mask, fields
The Login mask contains the fields and buttons listed in the following.
The data is created in the Expert software.
Example from the start file: startClientEx('admin','Alpha.123','D1024V','R1',1);
The data is created in the Expert software.
Example from the start file: startClientEx('admin','Alpha.123','D1024V','R1',1);
Important: Rules for user names and passwords
When selecting a user name and password, observe the rules specified in the online help of the Expert software!
2.6.1. User name
Input field, in the example admin
User name for login to the HomeServer or FacilityServer.
This user is assigned the start page in the visualisation.
User name for login to the HomeServer or FacilityServer.
This user is assigned the start page in the visualisation.
2.6.2. Password
Input field, in the example Alpha.123
Password for login to the HomeServer or FacilityServer.
Password for login to the HomeServer or FacilityServer.
2.6.3. Design
Input field (abbreviation), in the example D1024V
Indicates which design or which visualisation page is to be displayed. Otherwise, it has no further effect on the HomeServer AjaxVisu.
Indicates which design or which visualisation page is to be displayed. Otherwise, it has no further effect on the HomeServer AjaxVisu.
2.6.4. Refresh time
Input field (abbreviation), in the example R1
If a change is brought about with an element in the visualisation, for example a light is switched on, an automatic refresh of the page (the status of the object in question is determined and shown on the visualisation) is carried out at intervals that double each time.
This takes place until a period of time has passed which was entered under the refresh time in the HS/FS Expert.
Example:
5 minutes (= 300 seconds) are entered as a refresh time. In this case, an automatic refresh is carried out after 2, 4, 8, 16, 32, 64, 128 and 256 seconds.
2.6.5. Save information
Checkbox.
If this checkbox is activated, the user name and password, as well as all other settings are saved on the device as a cookie.
If this checkbox is activated, the user name and password, as well as all other settings are saved on the device as a cookie.
2.6.6. Login
Button.
By clicking on this button, the user logs in on the HomeServer or FacilityServer with the information previously entered and starts the visualisation following a successful login process.
By clicking on this button, the user logs in on the HomeServer or FacilityServer with the information previously entered and starts the visualisation following a successful login process.
2.6.7. 5th parameter
There is one additional parameter in the startgast.htm file which has no input field on the Login mask.
If a connection was terminated, when the connection is restored...
If a connection was terminated, when the connection is restored...
- ... with the value '0' the start page of the visualisation is displayed.
- ... with the value '1' the last page to be displayed prior to the termination is displayed again.
2.7. Installed files
The details of the HomeServer AjaxVisu are described in the following. These files can be adapted to the user's own needs (colours etc.) with a minimal knowledge of HTML. The installed files are divided into several sections, each of which can be found in a separate subdirectory. Sections:
- Graphics files, see Graphics files chapter.
- JavaScript files, see JavaScript files chapter.
- HTML files, see HTML files chapter.
2.8. Graphics files
The graphics files are stored in the img subdirectory of the hsav-gira folder. The files are used to enable, prevent or only display certain actions (e.g. clicks).
They are expanded or compressed horizontally and vertically in accordance with the required area.
You can replace the graphics files described in the following with your own if those contained in the sample project do not appeal to you. They may not simply only be deleted, but rather a file with the corresponding name must always be present!
You can replace the graphics files described in the following with your own if those contained in the sample project do not appeal to you. They may not simply only be deleted, but rather a file with the corresponding name must always be present!
2.8.1. Transparent ".png" files
Internet Explorer in all versions lower than version 7 does not support transparent graphics of the type "png".
These graphics are only displayed correctly from Internet Explorer Version 7.
These graphics are only displayed correctly from Internet Explorer Version 7.
2.8.2. Action area for buttons (transparent)
Designation: Ax0.gif
Transparent area, i.e. it has no colour and is therefore 100 percent transparent.
This file is used to be laid over all visualisation elements that are defined as clickable. It makes purely graphic elements into functioning buttons.
Transparent area, i.e. it has no colour and is therefore 100 percent transparent.
This file is used to be laid over all visualisation elements that are defined as clickable. It makes purely graphic elements into functioning buttons.
2.8.3. Click display (red area)
Designation: hide.png
Only partially transparent, red-coloured area, i.e. it is not completely transparent.
This file is used to be laid over a visualisation element for a short time after the user has clicked on it. This makes the click visible to the user. After one to two seconds the red area disappears again. However, this only occurs in the visualisation; the masks are excluded from this. See also Start files chapter.
2.8.4. Inactive buttons (white area)
Designation: Hide2.png
Only partially transparent, white-coloured area, i.e. it is not completely transparent.
This file is used, for example, to both display inactive buttons in the masks and to make them inactive for clicking.
Only partially transparent, white-coloured area, i.e. it is not completely transparent.
This file is used, for example, to both display inactive buttons in the masks and to make them inactive for clicking.
2.8.5. No background clicks in masks (grey background)
Designation: Hide3.png
Semi-transparent (grey) full-screen background, which is underlaid after a system mask (e.g. UT, value entry, etc.) is called. This avoids clicks on the background.
Semi-transparent (grey) full-screen background, which is underlaid after a system mask (e.g. UT, value entry, etc.) is called. This avoids clicks on the background.
2.8.6. No background clicks in pop-ups (grey background)
Designation: Hide4.png
Semi-transparent (grey) full-screen background, which is underlaid after a visualisation pop-up page is called. This avoids clicks on the background.
Semi-transparent (grey) full-screen background, which is underlaid after a visualisation pop-up page is called. This avoids clicks on the background.
2.8.7. Creating semi-transparent backgrounds
The Paint.NET program (freeware from Microsoft) can be used to create semi-transparent backgrounds for the visualisation. Proceed as follows for this purpose:
- Create new (empty) image
- Select all and delete: CTRL+A, DEL
- Select a colour in the "Colours" window
- Completely colour everything with the "Paint can" tool
- Click on the "Properties" button in the "Levels" window (at the bottom right-hand edge of the window)
- Set the opacity as desired in the pop-up window now displayed
2.9. JavaScript files
The JavaScript files are stored in the js subdirectory of the hsav-gira folder.
The files are used to breathe life into the HTML files, as it were. These files contain the program code which, for example, turns a drawn button or the transparent area which lies over it into a button that actually reacts to clicking.
The file currently used is called ajax.js.
The file currently used is called ajax.js.
2.10. HTML files
The HTML files are stored in the tpl subdirectory of the hsav-gira folder.
These files define the appearance of the predefined visualisation masks. They enable system integrators to make their own adjustments to the mask design.
Note: Changed entry option.
The Graph and Camera masks are not required (any longer) in the HomeServer AjaxVisu, as the same thing and even more in a larger range of variations can be achieved via embedding in the visualisation area.
Note: Changed entry option.
Some masks of the universal timer are no longer required in the HomeServer AjaxVisu, as use has changed compared to the default view. The complete functionality has nevertheless been retained.